Arduino Autonomous Vehicle
More articles coming soon - Building Arduino and Raspberry Pi electronic and computing devices including my Quadcopter Drone
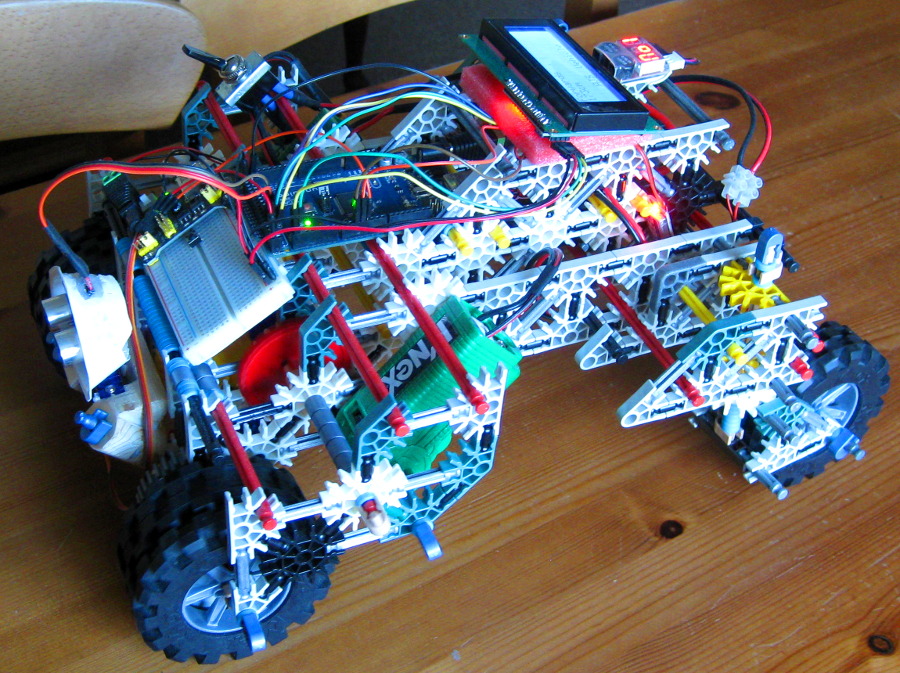
First attempt at an obstacle avoiding autonomous vehicle - rather bigger than the two wheel Arduino robots commonly seen.
A test bed vehicle built using K'NEX construction toy components and an Arduino Mega2560 clone microcontroller board programmed with C++. Two small K'NEX geared motors further heavily geared down using K'NEX gears to provide low speed and high torque to provide hill and obstacle climbing ability. Each motor was modified by adding dummy batteries made out of plastic conduit and metal washers, held in place by a new battery compartment cover made out of the same conduit material so they can be powered by a single two cell lithium 7.2v battery pack which also powers everything else on the vehicle via a 5 volt switched mode voltage regulator. A separate stand alone battery minder module (red alpha numeric led display) monitors and displays the voltage of the lithium battery pack and sounds an alarm when the pack reaches the minimum safe discharge level to avoid damaging the battery.
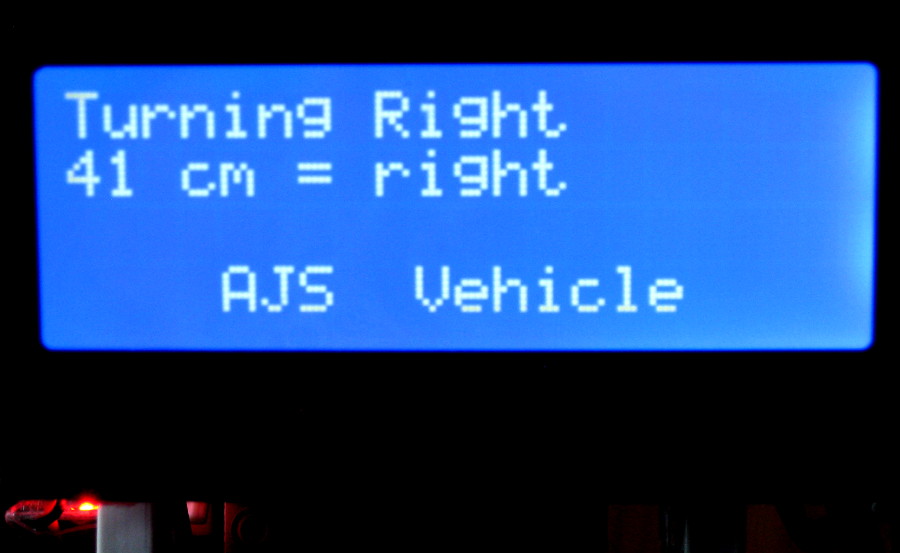
Each motor is independently controlled by the Arduino via a LM298N PWM (Pulse Width Modulated) speed controller, just visible underneath the blue and white LCD display panel, to give forwards, reverse and, by running the motors in opposing directions, allows it to turn in conjunction with the castoring rear wheels (originally a single rear wheel but now replaced with a pair). Obstacle detection is currently by a single ultrasonic sensor mounted on a small servo so the sensor can scan from side to side to enable the vehicle to detect obstacles in it's path and then decide which way to turn by checking for obstacles on either side of it. The Arduino averages multiple pings from the ultra-sonic sensor for each reading to reduce spurious readings. The blue LCD display fitted gives real time status updates showing distance to objects and which way the vehicle is going to turn and also allows debugging of code without the Arduino being connected to a computer.
Short Video of vehicle in operation (sorry not great quality)
Further refinements which are currently being considered include:
Improvements to the obstacle avoiding algorithm.
Addition of side firing ultrasonic sensors for improved obstacle detection. Experimentation has shown that the front mounted sensor alone can be fooled when aproaching angled surfaces which deflect the ultrasonic pulse (much like the angle surfaces of a stealth aircraft deflect/scatter radar).
Addition of a gyro/accelromenter/magnetometer sensor so that compass direction, body tilt etc can be monitored and utilised possibly to add goal seeking rather than just obstacle avoidance capabilities.
Addition of a current sensor to enable detection of overload/stall conditions on the motors.
Addition of speed/rotation sensors on each wheel to allow more precise turn and speed control, distance measurement, etc.
Addition of RF or bluetooth communications to allow control signal overide or telemetry as well as autonomous action.
Quadcopter Drone Project coming shortly!
Buying Components
I have found the cheapest way of buying components is to source them from reputable suppliers direct from china. Buying direct the components are incredibly inexpensive and usually offered with free postage. You may have to wait anything from a week to a month for them to be delivered but often the total price including delivery is less than the cost of delivery alone for locally sourced components and this has enabled me to buy and build things I wouldn't otherwise have been able to afford to do.
The suppliers I have used most often are:
AliExpress.com
Banggood.com
![]()